Luxe Watercolor Actions & More Guide
FollowOur Watercolor Collection is amazing for creating flexible custom artwork that looks like a watercolor painting. We take the guesswork out and automate the process, so all that's left to you is bespoke customization across multiple preset options that are just a toggle away!
Plus! With additional tools and resources including brushes, patterns, textures, and overlays your options for additional customization and creating artwork from scratch are endless!
Here we'll walk you through how our actions are organized and how to use them to get results you'll love!
Install Your Resources
Meet Your Luxe Actions
Watercolor Action Walk-Through
Install Your Watercolor Resources
Before you start using your new Watercolor actions, you'll want to be sure that all required resources are installed. This includes the actions, brushes, and patterns found in your download link!
Now, in many modern versions of Photoshop you can simply double-click on .atn, .abr, or .pat files (or open them with Photoshop) to automatically launch Photoshop and import the files. However, if this doesn't work, it's good to know where to go in Photoshop to import these files manually:
To install the brushes (.abr file):
Go to the Brushes Panel (Window > Brushes) and click to open the top right corner menu (three horizontal lines). Select Import Brushes… then locate the . abr file on your hard drive and click open to install. The actions will then be able to use these brushes as they run through and apply the watercolor or painting effects. You can also use your watercolor brushes manually to create custom art and graphics!
To install the patterns (.pat file):
Go to the Patterns Panel (Window > Patterns) and click to open the top right corner menu (three horizontal lines). Select Import Patterns... then locate the .pat file on your hard drive and click open to install. The patterns will appear in your Patterns Panel and can be used by the watercolor actions!
To install the actions (.atn file):
Go to the Actions Panel (Window > Actions) and click to open the top right corner menu (three horizontal lines). Select Load Actions... then locate the .atn file on your hard drive and click open to install. The actions will appear organized by collection in your Actions Panel as playable for use!
The Watercolor overlays are available in JPG and PNG and are intended for traditional overlay use in which the overlay is applied as a layer over your image and blended into your image to taste. Likewise, the included paper texture can be blended into your completed art piece or image to create the look of real art paper.
Meet your Luxe Actions
To begin, we'll walk you through the organization of our actions for this set! Our watercolor set includes our Luxe Action Toolkit so you can get your photo just right before transforming it into art!
Our Luxe Action Toolkit is broken up across the "QUICK ITEMS", "GENERAL WORKFLOW", "GRAIN", and "FINAL SHARPENING" sections for an easy-to-navigate workflow of all the little things you may need along the way. You'll find your collection actions nestled between the General Workflow & Grain sections of the toolkit.
Quick Items - Getting your layer panel ready for action!
Duplicate Image allows you to quickly copy your image to another layer, so that the copy will be selected when you go to play your actions or make any changes. This is great for when you know an action will carry out many steps and want to preserve the original for quick comparison without having to undo you work. *Not necessary for the Watercolor set, specifically, as the watercolor effects actions will create a new working file in a new tab.
Flatten All Layers turns multiple working layers into a single compressed layer containing all of your changes, so that when you play an action it affects all parts of your target image, and not just a single layer of changes you may have made on upper layers.
Flatten All Layers To New Layer If you want everything you've done compressed to a single layer, but don't want to lose anything you did on previous layers for later reference, you can always flatten all changes to a New Layer that sits above all previous layers.
General Workflow - Basic image correction
Auto Histogram Fix - Play this action to balance out extreme highs and lows in your image!
Exposure Increase - Increases overall brightness
Exposure Decrease - Decreases overall brightness
Exposure Even All Over - Creates an even brightness across your entire image
Contrast Increase - Increases the overall tonal range in your photo, making the lights brighter and the darks darker.
Contrast Decrease - Decreases the overall tonal range in your photo between brights and darks.
Depth Contrast - Adds a 3d depth of contrast that boosts dimensionality.
Highlight Booster - Increases highlights, brightening the lighter aspects of your image.
Highlight Dimmer - Decreases highlights, crushing the lighter aspects of your image.
Shadow Booster - Brings shadows up, to brighten the darker areas of your image.
Shadow Cruncher - Brings shadows down, to darken the shadowy areas of your image.
Shadow Recovery - Brings up dark areas of your image to recover lost details.
Highlight Recovery - Crushes or dims highlights to recover lost details.
Temperature Warmer - Corrects for images that are too cool, or adds a stylistic warmth to your image.
Temperature Cooler - Corrects for images that are too warm, or adds a stylistic cool to your image.
Saturation Increase - Increases color saturation across your image.
Saturation Decrease - Decreases color saturation across your image.
Haze Add - Creates a sun or film haze look across your image using the tone curve.
Haze Remove - Removes sun or film haze from your image using the tone curve.
Dodge & Burn - Dodge & Burn allows you to make localized exposure changes by painting with a brush over pre-created dodge and burn layers. (This action includes pop-up instructions for application).
Collection Actions - These actions are the core of the collection and will apply thematic changes to your images.
The naming here is indicative of the effect that will be created when you playthrough the action. With actions we always recommend playing each of them at least once to familiarize yourself with the collection upon purchase. Also be sure to read through all pop-up windows as these will guide you through crucial steps in the process or let you know when things aren't working!!
Grain - These actions apply a stylistic or filmic grain over your image.
Final Sharpening - These actions apply clean, professional sharpening over your final image.
Watercolor Actions Guide
Now that you know what you've got in your toolkit, let's jump into what to expect when you create your first art piece! Here we'll use "Modern Graphic Watercolor" as our example action:
Step 1: Open your Image and Locate your Actions
Step 2: Select your action by clicking on the title of the action and pressing the play button at the bottom of the Actions Panel
Step 3: This will create a copy of your image to a new tab to apply the action to your image without adjusting the source image you opened. There will be a pop-up stating this. Click "Continue" to continue.
Step 4: Immediately you should see a pop-up with instructions to isolate the details you wish to preserve. Read this message and then click "Stop" to start painting.
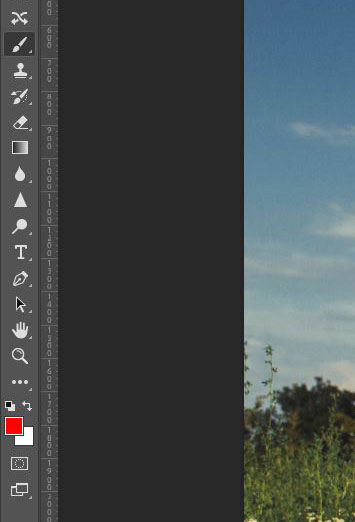
Your brush will be selected for you at this step and the color will be red:
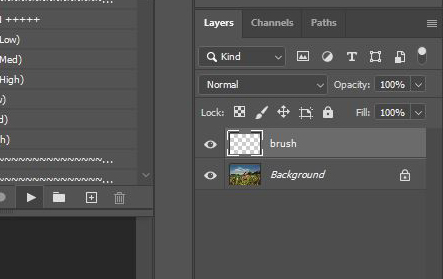
There will also be a brush layer already created for you. So you can paint over details immediately per the instructions without changing any settings or messing with your layers panel:

Once you have painted over all the details you wish to preserve (not have covered by watercolor effects), click on the play button in your actions panel once more:
Step 5: You will watch the action complete an entire workflow that creates all of the elements required for the finished art piece including optional elements you can apply, remove, or adjust once the action is complete:
Once you've read through the final pop-up message, head on over to your layer panel and expand the folder to view all completed steps and effects applied to your image.
To get a feel for what has been applied on each layer, visually, you can click the little eye icon to the left of each layer to toggle effects off/on, like so (In this example we hide some of the light effects closest to the subject by toggling the layer to "off"):
You can also selectively erase or adjust applied effects via layer masking or more complex processes, according to your comfort level in Photoshop!
The best part of this collection is the limitless possibilities as you continue to familiarize yourself with the process, effects, and available tools! Want a more in-depth tutorial involving more precise selection and even background removal for your watercolor art? Check out the latest guide on our blog HERE!
You can find more on making adjustments to layers applied by actions in Photoshop on our Help Center.
Have questions? Reach out to our team at support@theluxelens.com for more!
Featured images courtesy: Melissa Cuskelly & Teresa Peterson